Building Nutanix AHV Templates with Packer
Packer is a tool that many IT Infrastructure professions would be familiar with. Packer allows the creation of “machine images” (or base templates) in a way that’s consistent and highly repeatable. The result is machine images that can be used on a variety of platforms such as cloud providers like AWS or Azure or on-prem infrastructure like VMware, all configured to your organisation’s needs.
Nutanix has its own Virtual Machine format called AHV, which runs on Nutanix’s hypervisor Acropolis. Since this hypervisor is based off the KVM hypervisor, and Packer has support for KVM, Packer can be used to build templates for a Nutanix target platform. This post will detail the process I went through to create a Windows 2016 template for Nutanix.
Creating The Builder
Packer has the concept of a Builder – the platform where your template is created. One of these Builders is QEMU (Quck Emulator), which open source emulator or virtualisation platform. QEMU can also leverage so-called “accelerators” like KVM. With this information in mind, you can look at creating a Builder platform. In my case, I used a Linux-based VM running on VMware ESXi.
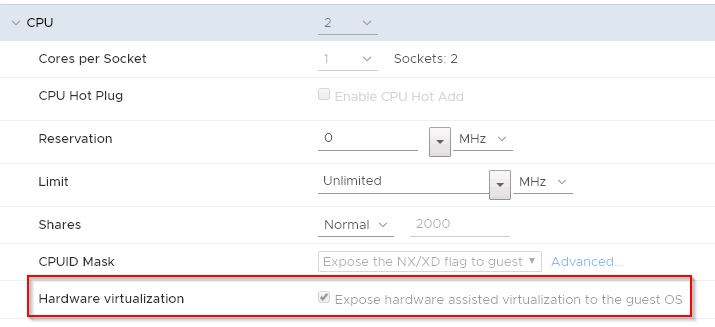
When creating the Virtual Machine, ensure that Hardware Virtualisation is enabled in the VM’s settings (as shown below). This ensures that virtualisation features are available to QEMU/KVM.
Provision the Virtual Machine with a Linux operating system. I originally used CentOS as this is the distribution I’m most comfortable with, but there’s a bug that prevents the use of SCSI-based controllers. So I ended up using Debian. When the OS has been installed, confirm that the virtualisation features are available with the following command:
lscpu | grep Virtualization
At this point, you can install QEMU and Packer:
# Do an update
apt update

# Install QEMU/KVM
apt install qemu qemu-kvm

# Install wget
apt install wget

# Download Packer
wget https://releases.hashicorp.com/packer/1.3.5/packer_1.3.5_linux_amd64.zip

# Unzip packer
unzip packer_1.3.5_linux_amd64.zip
If you plan to build the templates with headerless mode set to false (which is helpful for troubleshooting), then you’ll need a GUI of some sort. I installed GNOME to handle this:
# Install GNOME Desktop
apt groups install "GNOME Desktop"
At this point you can move onto transferring the artifacts required to perform the build
Building A Template
Transfer the artifacts to build your template to the Builder VM, such as installation media, the packer json file, scripts, etc. Once everything is staged, you can run packer:
./packer build qemu-centOS-7-base.json
If successful, you should see some output similar to what’s shown below:

To build a Windows-based template, so additional work is required. The default SCSI controller that Nutanix uses is the “VirtIO SCSI pass-through controller”, which like VMware’s Paravirtualised SCSI controller, doesn’t have native driver support on Windows. The same is true for the network card (VirtIO Ethernet Adapter). Without additional work to support these, the OS installation grinds to a halt very early on, as the installer can’t find storage to install onto.
To provide the drivers required, I downloaded the virtIO drivers from the Fedora Project site and added them to the artifacts. These files were then added to the list of those presented to the virtual machine being built and thus are automatically picked up by Windows.
"floppy_files": [
        "answer_files/2016/autounattend.xml",
        "scripts/enable-winrm.ps1",
        "drivers/NetKVM/2k16/amd64/*.cat",
        "drivers/NetKVM/2k16/amd64/*.inf",
        "drivers/NetKVM/2k16/amd64/*.sys",
        "drivers/vioscsi/2k16/amd64/*.cat",
        "drivers/vioscsi/2k16/amd64/*.inf",
        "drivers/vioscsi/2k16/amd64/*.sys",
        "drivers/viostor/2k16/amd64/*.cat",
        "drivers/viostor/2k16/amd64/*.inf",
        "drivers/viostor/2k16/amd64/*.sys"
      ]
In the example code above, I’ve included the drivers for the network card and SCSI controllers. The only other specific setting I made was to set the disk controller to virtio-scsi. There were also some settings specific to building a Windows-based template.
Presenting The Template
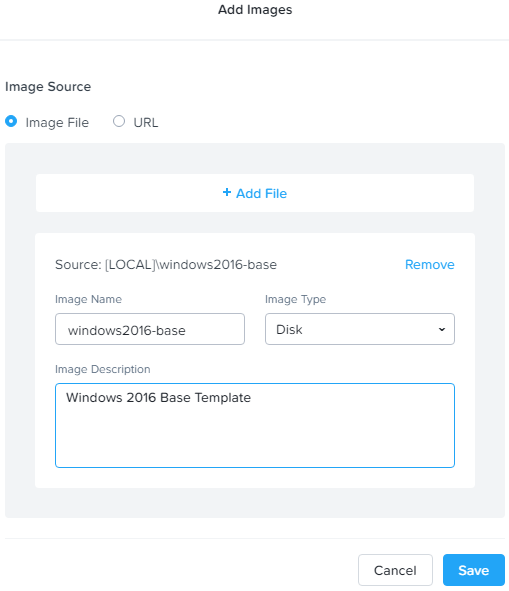
Once the template has successfully built, its time to get the output artifact into Nutanix. Nutanix has an “Image Service” where you can upload ISOs and templates for use. The process to add the template is quite simple. Login to Prism, go to Virtual Infrastructure > Images. Click on the Add Image button and fill in the details. An example of adding a Windows 2016 image is show below:
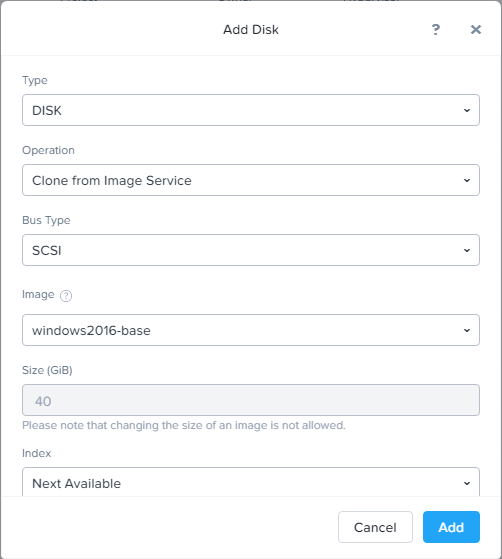
Once the upload is finished, the image will appear in the list of those available. At this point, you can create a virtual machine based off this new image. To do so, navigate to Virtual Infrastructure > VMs. Click on the Create VM button. When you go to add a disk, you can specify the image by changing the Operation from “Allocate on Storage Container” to “Clone from Image Service”. The UI will change slightly to allow you to select the image you want to use. An example of how this might look is shown below:
Finish configuring the VM as you normally would. Once the Virtual Machine has been created, you can power it on and observe the bootup process. It should boot up in a fully functional state due to the additional drivers added during the packer build.
Extending Past MVP
At this point, the process is really a Minimum Viable Product (MVP). Ideally, a more refined product would be part of an automated framework. At the moment, the workflow looks like this:

Under this workflow, the initiation is manual and the output artifact still needs to be transferred to the Nutanix infrastructure. A more refined form may look like this:
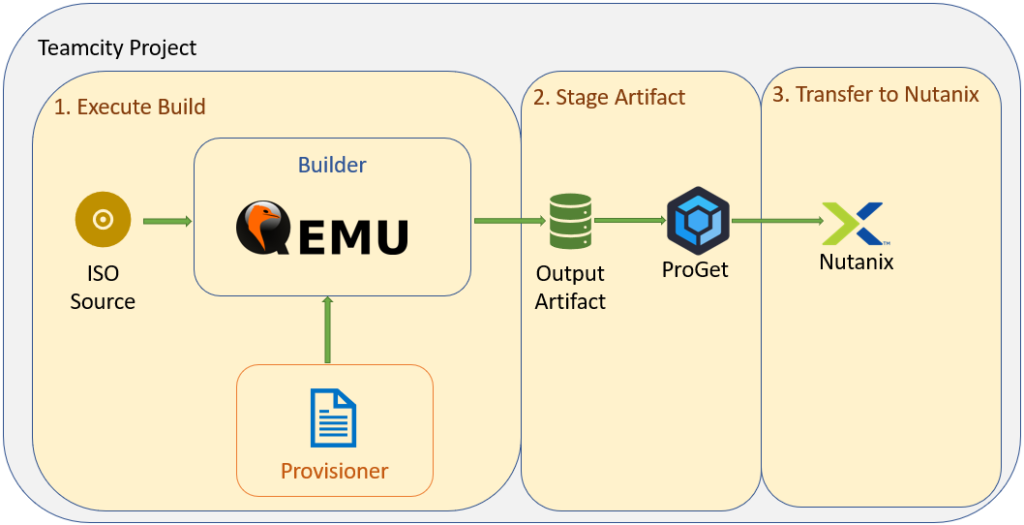
This sort of workflow is very similar to what’s been used in past workplaces and could be extended further to include testing and other steps.
Lessons Learned
During the process of trying to create templates for Nutanix, I did run into a few issues. Some of these included:
- I initially tried using VirtualBox but it appeared that the Virtualisation features weren’t fully exposed
- There was a note in the packer documentation about use of the scsi disk interface with Red Hat-based distributions. I ignored that error since it was working at the start and switched to the virtio-scsi interface later on (which apparently doesn’t work)
- The issue above wasn’t surfaced in packer’s default output. This led to me spending time trying to figure out what happened
- Due to the scsi disk controller issue, I switched to using Debian and used the stable release. The version of QEMU associated with this release was slightly older and also caused issues. I ended up switching to Debian unstable
- I haven’t fully confirmed this, but I think I got errors building Windows VMs via a terminal, even with headerless mode turned on.
Acknowledgements & Resources
When I first started working on this piece of work, I had trouble finding any articles or writings that others had done on it. The one I did find was “Using Packer to Build Images for the Acropolis Hypervisor” by Andrew Nelson. This particular article was a major help in me getting this piece of work started and finished. Resources that others might find of use if they’re looking at doing a similar piece of work: