Home lab expansion
For a while now I’ve been hitting the capacity limit of the single server in my home lab. This is the nature of running a lot of VMware’s more recent products on it. The plan had been to get another server, shared storage and a larger switch. This week I was able to bring it all together. There were some problems.
What I already had
The original setup I had included the following items:
- 1 Dell R710 with a Samsung 970 Evo Plus M.2 SSD (in a M.2 to PCIe adapter), a 128GB SATA SDD and a 1TB SATA SSD
- 1 5-port Gigabit switch
- 1 5-outlet power board
The Second Server
For the second server, I tried to get something that was as close to my current one as possible. This meant another Dell R710 with a similar model of CPU and about 128GB of RAM. Fortunately I was able to easily find one for sale on ebay. It came with 4 x 300GB SAS drives. I ended up moving 2 of these to the original server and creating a RAID 1 on each server.
Shared Storage
The primary concern for the storage was capacity and some level of redundancy over rare performance. Both the original server and my PC have SSD storage, which is limited in capacity. My old home lab had a Synology 8-bay NAS but I could never get the iSCSI feature working. I decided on a Synology DS918+ which is a 4 bay NAS. Historically I’ve used Western Digital for hard drives but recently there’s been a bit of bad press about them. Instead I went for Seagate’s Ironwolf in a 4TB capacity.
It was with these drives that I ran into my first problem with this setup. One of the drives was dead out of the box. Trying to source a replacement turned into a bit of a drama but I was able to get one and get the NAS up and running. Another task I did was take the Samsung 970 Evo Plus that had been in the first server and put it in the Synology as a SSD cache. Hopefully this will help with performance.
Networking
I had previously been running an 8-port Gigabit switch in my home lab. I wanted to be able to populate all the network interfaces on all the devices, which meant getting a larger switch. This again caused a bit of drama. However I was able to get one and get all the ports hooked up.
Power
Originally I had been using a basic 5 output power board to run the home lab. It meant that only one power supply for the servers was connected. My desired intent was to get something with more outlets and surge protection. I managed to get a 10 outlet board to do this.
Thoughts on the home lab procurement process
A couple of issues that happened when getting all these pieces left a bad taste in my mouth. I made the order for the NAS and hard drives on Monday morning at a store in the same metro area as me, yet it took until Friday to arrive. This was after paying for “express shipping”. Part of this delay was potentially caused by the fact that my order sat in a “processing” state for at least a full 24 hours.
At the point I found out I had a dead hard disk, I still needed to get a switch, so I figured I would order the switch and another hard disk. This time I would collect it in person. This time it took 15 hours to clear. As a counterpoint, the same day I did an online order with another store. The time from order confirmation to pickup confirmation was under an hour. So I think it’s obvious who I’ll be using next time.
The other issue I ran into was when I called the first shop about the dead hard disk. This disk clicked quite loudly when plugged in, a good sign it’s dead. Hard disks are DOA all the time. And in this case, we’re talking a $180 inventory item, not a lot. Instead of offering on the spot replacement or a refund, the shop wanted to put me through an onerous process. They wanted the hard disk in its original package, which is just an anti-static bag. While this isn’t difficult to cover in this case, I’m sure this is actually a violation of Australian consumer law. Additionally, they wanted to “test” it to verify it was broken, then send it back to the vendor. This potentially could take weeks and still leave me short a hard disk.
Connecting Storage to Servers
I decided to try using both storage protocol options. Part of this is because it’s easier to transfer files to an NFS share from my PC (because it’s also exposed as SMB). The other part was I had significant issues with iSCSI when I used it on my old NAS. The Synology iSCSI implementation can support VAAI (vStorage API for Array Integration). VAAI allows VMware to “offload” certain tasks to the storage device. These can be tasks like cloning. After connecting the servers to the iSCSI LUN, it was possible to see whether it was supported or not. To do this, I used the command esxcli storage core device vaai status get. The results for the iSCSI LUN are shown below.
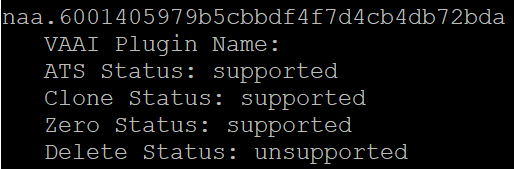
For block storage like iSCSI, there are 4 so-called “primitives” available:
- ATS – Atomic Test & Set. Generally there is more than one host accessing the same iSCSI LUN, so there needs to be a way of ensuring 2 hosts aren’t accessing files at the same time (if they were, it could lead to corruption). This creates the need for a “locking mechanism” to signal when a host is manipulating a file. ATS is a form of this locking. In earlier releases of vSphere, SCSI reservations were used, which used LUN-level locking. ATS is more granular and according to VMware, helped address contention issues that happened with SCSI reservations
- Clone – In the official documentation, this is called XCOPY (Extended Copy). If XCOPY isn’t available, then something like a clone operation is run through the Data Mover driver, which consumes resources on the host. When XCOPY is available, the array can perform a full copy in a more efficient manner.
- Zero – Also called Write Same in VMware’s documentation. It’s leveraged when performing an “eager zeroing” of a VMDK. In the zeroing process, the storage for a VMDK is allocated and then zeroes is written to it. Like the clone operation, if VAAI isn’t available, it consumes resources on the host and for large disks, can be incredibly time consuming. If VAAI is available and this primative supported, this task can be offloaded to the array.
- Delete – This last item relates to space reclaimation. If the LUN is capable of handling SCSI UNMAP commands, then it will list this as supported. In the case of the LUN in the screenshot above, I didn’t enable this.
Storage Testing
To test whether this works, I created a Windows 2019 VM using packer and had it situated on the appropriate datastore. The intent was to clone it. When viewing the relevant fields in esxtop, it’s possible to see VAAI activity is happening.

Before the clone, the clone_rd and clone_wr were zero. After the clone there’s a change in the numbers. I’d also say it seemed to do the clone very quickly. The original VM had a 50GB thin provisioned VMDK, taking about 9GB of space. The clone took about 30 seconds. This represents a speed of about 300MB/sec, which vastly exceeds what is possible over the ethernet interface of the NAS. This suggests the operation was performed entirely on the NAS. The lack of network traffic by the host during this time appears to back this up.
As a followup to this, I storage vMotioned the VM around to get the VMDK to be thick provisioned. So now it was taking up 50GB of space. I performed a clone and it was done in seconds. I did it a 2nd and 3rd time. Each time it took 3-5 seconds. Both test scenarios (thin and thick provisioned disks) are the sort of performance I wanted to get out of my old NAS but never could. In my old home lab, I was waiting up to 5 minutes for these sort of cloning operations.
Summing Up
After a little too much drama, I’ve got my home lab expanded and at a state I’m happy with. Before I started this process, I had to delete some VMs I deemed not critical (or at least, ones that would be relatively easy to setup again) to free up space. The next phase will be provisioning those servers again.