Skip to content

2017

Project Honolulu – First impressions

Project Honolulu is Microsoft’s attempt at revamping the server administration experience. Historically the Windows server toolkit has been built around using numerous MMC (Microsoft Management Console) plugins – things like Event Viewer, AD Users and Computers and DNS Management are all built on MMC. We’ve seen a couple of attempts at revamping this in the past, there was Server Manager in 2008 and a refreshed form in 2012.

I suspect one of the driving forces behind Honolulu is the shift from RPC-based connectivity to WinRM for remote administration of servers. Honolulu seems to represent an alignment with this since it supports only Server 2012 onwards as nodes to manage, and its gateway component installs on Windows 10 or 2016. The documentation claims the management functions are performed using remote powershell or WMI over WinRM.
VCSA 6.5 Root Account Password – Reset and Cause Investigation

One of the more frustrating experiences one can experience with VMware’s vCenter Server Appliance (VCSA) is having the root account locked out or forgetting the password for it. I recently experienced this after I rebuilt the VCSA in my home lab from scratch.

How to Reset the VCSA Root Password VMware have a short process on how to reset the password for the root account, detailed in KB2147144. THe process is:

  1. Backup the VCSA (via snapshot or other means)
  2. Reboot the VCSA
  3. During the boot process, when the photon splash screen appears press the e key to get into the boot menu
  4. In the text box that appears, go to the line starting with “linux”. Go to the end of the line (which is right after the text “consoleblank=0”) and enter the text rw init=/bin/bash This will cause the boot process to jump right into the bash shell without needing credentials
  5. Press F10 to continue booting
  6. At the command prompt, run the passwd command to reset the password
  7. Unmount the file system by running umount /
  8. Reboot the VCSA using reboot -f
  9. Following reboot, confirm the new password works
  10. If you took a snapshot in step 1 remove it

Adding extra service mappings to Nexpose

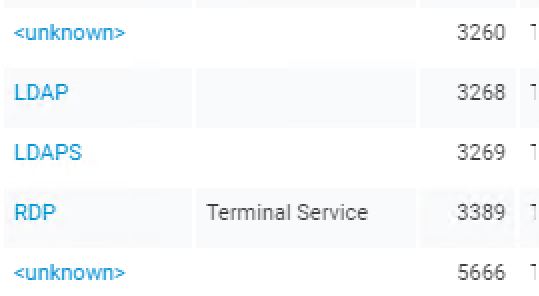
Nexpose does have good coverage of services in the “well known” range of ports (0-1024). An environment with a lot of propriety systems will cause Nexpose to some services as unknown or even misidentifying them. The screenshot below is a good example of this.

Image

The example is from a Domain Controller. Nexpose identifies the port 3389 service correctly as RDP. Ports 3269/32769 are used by the Global Catalog service, so labelling them as LDAP/LDAPS isn’t strictly accurate. For port 3260 and 5666 it gives up. Depending on your needs, you may want to get these labels a bit more accurate. This can be achieved by using a custom service names file (you can alter the default one, but it’s probably best to leave that in its default state).

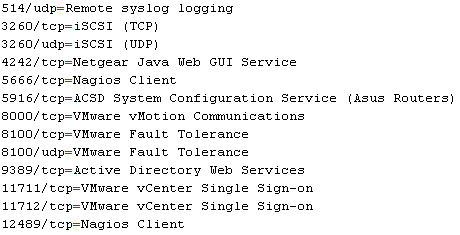
The default file, default-services.properties, is located in the <install location>/plugins/java/1/NetworkScanners/1 folder. The format is basic, with each line as <port #>/<tcp or udp>=<Service Name>. Some of the custom ports I added are shown below:

Image

Once the properties file is in a state you’re happy with, place it in the same folder as the default one and either create a new or edit an existing scan template and put the file name into the field on the Service Discovery section. Load up the page of an asset to test and queue a scan on it with the scan template. The reported services should update with the new values.