Microsoft has finally announced the General Availability (GA) release of PowerShell 7.0. This represents a fairly significant milestone in PowerShell’s history. In this post, I’ll go through some of the history prior to this point, what’s new in this release and how it works in practice.
Powershell
Automating Vulnerability Scans – Nexpose/Powershell
One of the common things I’ve seen in automation implemented by infrastructure teams is a lack of rigor around testing. That is to say, code that tests the task that is being automated is actually successful. A script could execute to its end without errors, but that doesn’t necessarily mean it actually did what it was supposed to.
This leads into a concern I’ve seen raised by stakeholders, about visibility of what is happening in an automation pipeline. One of the key stakeholders in this sort of security is the IT Security team, who often want visibility of certain outputs (like virtual machines) to determine if those are secure. In a couple of environments I’ve raised the idea of performing automated vulnerability scans on newly provisioned assets, as a way of ensuring what is delivered is at an acceptable level. By automating this task, we place no extra burden on those involved and ensure consistency.
vCenter 6.7 Update 2 – Code Capture
One of the very cool new features that came with the latest vCenter update is Code Capture. This feature allows you to “record” actions in the HTML 5 web client. When the “recording” is ended, Code Capture will generate PowerCLI.NET code. For those who used Exchange 2007, you may remember a similar feature in the GUI management console. At the end of each wizard, there was a summary of PowerShell code that would perform the same task you just finished.
Code Capture has been around for a while as part of the HTML 5 Client Web Fling. However, at the time, it was not appropriate for production use. With the feature being included in 6.7 Update 2, it now is appropriate for use.
vRealize Orchestrator – PowerShell Hosts
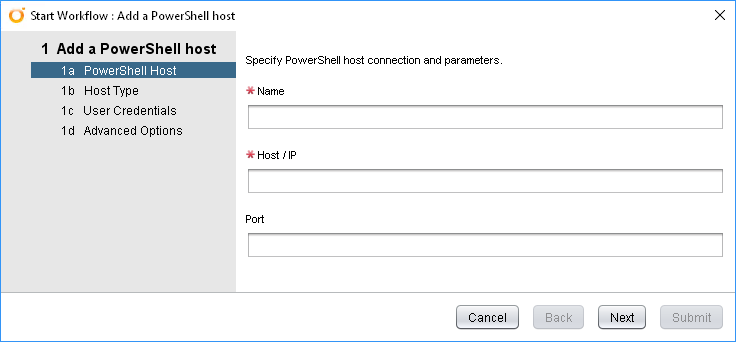
PowerShell Hosts are one of the types of endpoint available in vRealize Orchestrator’s Inventory. By having a PowerShell Host, you can leverage the breadth of PowerShell functionality from within your vRealize Orchestrator workflows. In this article, I’ll run through adding a PowerShell Host as well as some considerations from a technical and security point of view.
Adding A PowerShell Host
vRealize Orchestrator has a built-in Workflow for adding a Host under Library > PowerShell > Configuration. Run the “Add a PowerShell host” Workflow to start it. The opening interface is below:
SQL As A Service Proof of Concept with SQL 2012 and vRealize Automation
Standing up a redundant/highly available database infrastructure can be one of the more complicated pieces of work. Doing it by hand is a long process with any points where errors could happen. It was with this in mind that I decided to use this as my first “project” with vRealize Automation.
A Brief History of SQL Server High Availability
When discussing redundancy or high availability (HA) for databases, there’s two distinct outcomes – firstly to ensure the continued delivery of the service in the event of infrastructure failure (the actual HA part) and secondly to ensure the data is kept in an orderly fashion (data integrity, no loss of data, etc). Where these two activities happen depend on the technology used.
In older versions of SQL Server, these outcomes were achieved using SQL Clustering. In SQL Clustering, the HA function was achieved at the server level by having 2 or more servers, while data integrity was maintained by the database residing on shared storage.
Windows 7 Remote Assist Wrapper Script
One of the functionality changes in Windows 7 was to Remote Assistance. In XP, you got a nice GUI to input the machine name or IP address of the target machine. In Windows 7, this was changed in a way where it was difficult to do this. You could do it via the command line. As an academic exercise I wanted to create a graphical wrapper for this that duplicated the XP Remote Assistance experience for service desk.
[void][System.Reflection.Assembly]::LoadWithPartialName("System.Windows.Forms")
[void][System.Reflection.Assembly]::LoadWithPartialName("System.Drawing")

#endregion

#region Post-Constructor Custom Code

#endregion

#region Form Creation
#Warning: It is recommended that changes inside this region be handled using the ScriptForm Designer.
#When working with the ScriptForm designer this region and any changes within may be overwritten.
#~~< form1 >~~~~~~~~~~~~~~~~~~~~~~~~~~~~~~~~~~~~~~~~~~~~~~~~~~~~~~~~~~~~~~~~~~~~~
$form1 = New-Object System.Windows.Forms.Form
$form1.Text = "ASG Remote Assistance"
#~~< btnStartRA >~~~~~~~~~~~~~~~~~~~~~~~~~~~~~~~~~~~~~~~~~~~~~~~~~~~~~~~~~~~~~~~~
$btnStartRA = New-Object System.Windows.Forms.Button
$btnStartRA.Location = New-Object System.Drawing.Point(13, 219)
$btnStartRA.Size = New-Object System.Drawing.Size(230, 23)
$btnStartRA.TabIndex = 4
$btnStartRA.Text = "Start Remote Assistance"
$btnStartRA.UseVisualStyleBackColor = $true
$btnStartRA.Enabled = $false
$btnStartRA.Add_Click({ StartRA })
#~~< lstCompInfo >~~~~~~~~~~~~~~~~~~~~~~~~~~~~~~~~~~~~~~~~~~~~~~~~~~~~~~~~~~~~~~~
$lstCompInfo = New-Object System.Windows.Forms.ListBox
$lstCompInfo.FormattingEnabled = $true
$lstCompInfo.Location = New-Object System.Drawing.Point(13, 86)
$lstCompInfo.SelectedIndex = -1
$lstCompInfo.Size = New-Object System.Drawing.Size(259, 108)
$lstCompInfo.TabIndex = 3
#$lstCompInfo.Text = ""
#~~< btnConnect >~~~~~~~~~~~~~~~~~~~~~~~~~~~~~~~~~~~~~~~~~~~~~~~~~~~~~~~~~~~~~~~~
$btnConnect = New-Object System.Windows.Forms.Button
$btnConnect.Location = New-Object System.Drawing.Point(197, 37)
$btnConnect.Size = New-Object System.Drawing.Size(75, 23)
$btnConnect.TabIndex = 2
$btnConnect.Text = "Connect"
$btnConnect.UseVisualStyleBackColor = $true
#$btnConnect.Add_Click({ $lstCompInfo.Items.Add("This is a test") })
$btnConnect.Add_Click({ GetDetails })
#~~< txtCompName >~~~~~~~~~~~~~~~~~~~~~~~~~~~~~~~~~~~~~~~~~~~~~~~~~~~~~~~~~~~~~~~
$txtCompName = New-Object System.Windows.Forms.TextBox
$txtCompName.Location = New-Object System.Drawing.Point(13, 39)
$txtCompName.Size = New-Object System.Drawing.Size(168, 20)
$txtCompName.TabIndex = 1
$txtCompName.Text = ""
#~~< Label1 >~~~~~~~~~~~~~~~~~~~~~~~~~~~~~~~~~~~~~~~~~~~~~~~~~~~~~~~~~~~~~~~~~~~~
$Label1 = New-Object System.Windows.Forms.Label
$Label1.Location = New-Object System.Drawing.Point(13, 13)
$Label1.Size = New-Object System.Drawing.Size(215, 23)
$Label1.TabIndex = 0
$Label1.Text = "Enter Computer Name or IP Address:"
$form1.Controls.Add($btnStartRA)
$form1.Controls.Add($lstCompInfo)
$form1.Controls.Add($btnConnect)
$form1.Controls.Add($txtCompName)
$form1.Controls.Add($Label1)

#endregion

#region Custom Code

#endregion

#region Event Loop

function Main{
[System.Windows.Forms.Application]::EnableVisualStyles()
[System.Windows.Forms.Application]::Run($form1)
}

function GetDetails
{
$strComputer = $txtCompName.Text
$strConnStatus = test-connection -computername $strComputer -quiet

if ($strConnStatus -eq $true)
{
# connection worked, continue script
$lstCompInfo.Items.Add("Connection successful...")
$objUsername = gwmi -computer $strComputer Win32_ComputerSystem | select username, model
$strUserName = $objUsername.Username
$strModelName = $objUsername.Model
$lstCompInfo.Items.Add("Current User is $strUserName")
$lstCompInfo.Items.Add("The target computer is a $strModelName")
$btnStartRA.Enabled = $true
$btnStartRA.Text = "Start Remote Assistance for $strComputer"

}
else
{
# connection failed
#Write-Host "Connection failed with status "
$lstCompInfo.Items.Add("Connection failed.")
$btnStartRA.Enabled = $false
#$strConnStatus | select *
}

}
function StartRA
{
$RAconName = $txtCompName.Text
$lstCompInfo.Items.Add("Attempting to connect to $RAconName" )
cmd /c msra /offerRA $RAconName
}

#endregion

#endregion

#region Event Handlers

Main #This call must remain below all other event functions

#endregion
Some of the lines are note are:
- Line 24 – The Add_Click will call the function that performs the Remote Assistance connection
- Line 76 – The script performs a test to see if the system name is responding
- Line 87 – As part of the IF…THEN statement, if the connection status is true, the connect button is enabled by this line.
- Line 106 – This line performs the command line version of the Remote Assistance connection, using the supplied computer name in the command
Windows 7 SOE – Reset Computer Groups Script
The application deployment setup in SCCM 2007 means you have to tend towards application deployment based on a user’s computer rather than the user’s account. One method of doing this is to have the computer in security groups that relate to collections to deploy the applications. For example, you may have a security group called “SCCM_Viso2010” to deploy Visio 2010. Where this becomes an issue is when you reimage the machine, you need a method of resetting the machine back to a default state so it doesn’t recieve those extra apps again. The script below was designed to achieve this.
add-pssnapin quest.activeroles.admanagement

write-host "Getting SID, GUID and DN for $env:computername"
$strComputer = get-qadcomputer $env:computername | select sid,guid,dn

write-host "Getting groups for $env:computername"
$strComputerGroups = get-qadmemberof $strComputer.SID

foreach ($obj in $strComputerGroups) {
if ($obj.Name -eq "Domain Computers")
{
write-host "This is the default group, do nothing"
}
else
{
write-host "The group $obj is a non-standard group"
remove-qadgroupmember -identity $obj -member $strComputer.SID
}
}

# Removing Quest AD snapin
remove-pssnapin quest.activeroles.admanagement
The behaviour of the script is to remove any group that isn’t the default group of “Domain Computers”. Like the OU move script, it utilises the Quest AD cmdlets.
Windows 7 SOE – Set Computer OU Script
One of the nice things about a Windows 7 SOE is it opens up the use of Powershell during the second phase of the OS installation. Part of the SOE design for I worked on required some manipuation of items in Active Directory. Doing this in VBScript is something I’ve found difficult, while it can be very easy in Powershell, especially if using the Quest AD cmdlets.
In this situation, the requirement was to move the computer account from the default location for the machine account creation (the Computers container) to an custom OU so the computer would fall under the influence of numerous group policies. The script is detailed below:
add-pssnapin quest.activeroles.admanagement
$strComputer = $env:computername
$currDate = get-date -format g
add-content -path c:windowstempASGMoveComputertoCorrectOU.log -value "$currDate --- Starting OU Check"

$strGetComputer = get-qadcomputer $strComputer | select sid,GUID
$strGetComputerSID = $strGetComputer.sid

$strParentDN = get-qadobject -identity $strComputer -type computer | select parentcontainerdn
$currDate = get-date -format g
add-content -path c:windowstempASGMoveComputertoCorrectOU.log -value "$currDate --- Current OU is $strParentDN"
if ($strParentDN.ParentContainerDN -eq "OU=Windows7SOETesting,OU=SCCM Managed PCs,DC=asggroup,DC=com,DC=au" )
{
$currDate = get-date -format g
add-content -path c:windowstempASGMoveComputertoCorrectOU.log -value "$currDate --- This computer is in the correct OU"
}
else
{
$currDate = get-date -format g
add-content -path c:windowstempASGMoveComputertoCorrectOU.log -value "$currDate --- This computer is not in the correct OU"
add-content -path c:windowstempASGMoveComputertoCorrectOU.log -value "$currDate --- Attempting to move this computer with SID $strGetComputerSID to the correct OU...."
move-qadobject -identity $strGetComputersid -NewParentContainer 'OU=Windows7SOETesting,OU=SCCM_Devices,DC=contoso,DC=com'
add-content -path c:windowstempASGMoveComputertoCorrectOU.log -value "$currDate --- Move operation completed."
}
remove-pssnapin quest.activeroles.admanagement
A lot of the code is taken up with various setup code, but the key line is 22, which moves the machine account to the Windows 7 SOE OU.
Accessing ServerManager cmdlets remotely
I’ve been working on a little project of late that requires a Powershell script to check what roles a server has installed. Under 2008, this is fairly trivial as there is a ServerManager module for Powershell which can simply output which roles are installed. This is fine if you’re wanting to run the check locally, but what if you want to run it remotely? And if your local machine is not running 2008?
I tried to be sneaky and copy across the ServerManager module files but this didn’t work. I posted on the Microsoft powershell forums for help before I found the answer myself – use the invoke-command cmdlet. Below is an example of the code I used:
$strComputer = "someserver" # The server to run the command against
$strCommand = { import-module servermanager ; get-windowsfeature | Where {$_.installed -eq $true} | select displayname,name,installed,featuretype} # import the module, run the command to get the features that are installed
$FeatureList = invoke-command -computername $strComputer -scriptblock $strCommand # invoke-command against our remote server and run command we constructed
$FeatureList can then be manipulated as you see fit. This sort of thing could probably be used for a range of tasks.
Powershell Task of the Day – Move Mailbox for all users in an Organisational Unit (part 2, Bulk move)
A follow on from the previous script was to move a larger number of users in a list of OUs. To make the task easier, I decided to automate it a bit:
$miglist = import-csv c:scriptsmigration.csv

foreach ($item in $miglist)
{
$strTargetmbx = "EXCH02" + $item.tiernumber + "-east" + $item.tiernumber + "-east"
$strReportFile = "c:scripts" + $item.name + ".xml"
Get-Mailbox -server "EXCH01" -OrganizationalUnit $item.ouname | `
Move-Mailbox -Confirm:$False -TargetDatabase $strTargetmbx -SourceMailboxCleanupOptions DeleteSourceMailbox -ReportFile $strReportFile
}
In the first line, I’m importing the contents of a CSV file that listed the OUs, a friendly name for the OU and the “tier” database those users were to go in. Iterating through the $miglist, I construct the target mailbox database name ($strTargetmbx) and report filename ($strReportFile). The Move-Mailbox command uses the -Confirm:$False switch to suppress confirmation. If this switch isn’t used, you will be prompted for confirmation at each step. The rest of the move command is pretty simple, specifying where to move to and a report filename.