I had been burned by updating vRealize Automation a little too quickly following a hotfix release. Chrome 75 caused some rendering issues in the deployment forms. These issues were resolved by Hotfix 1, which introduced some extra issues. The most visible one is the duplicate requests on an XAAS (Anything as a Service) blueprint. An example of this behaviour is shown below
Duplicate request
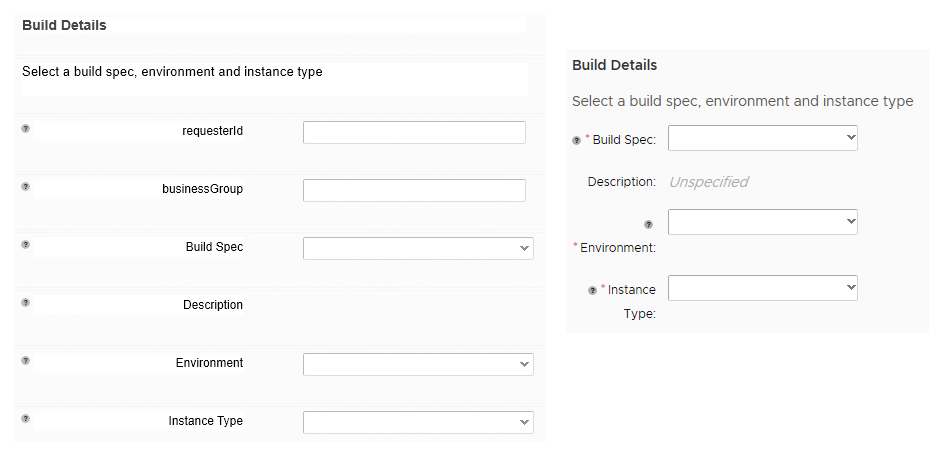
The second issue that I’ve seen as cosmetic. It was resolved in Hotfix 2. In this issue, labels on an XAAS blueprint rendered correctly in the Designer but when requesting the blueprint via the catalog, the label text would wrap. An example of this is in the image below:
VMware have released a minor update for vRealize Automation (vRA) 8. This is my experience of attemtping to update the instance running in my home lab.
Update Preparation
In the Release Notes for 8.0.1 there’s a section for performing an upgrade. A couple of items in this section jump out. Firstly, that the vRA product supports upgrading from vRealize Suite Lifecycle Manager (LCM), with a link on the process. The second is an explicit mention of disk space requirements. Based on this, the first thing I checked was the free space for the two partitions mentioned.
VMUG recent added the vRealize Suite 2019 to their EVALExperience offering. For those not familiar with it, EVALExperience is part of the paid “Advantage” member in VMUG. This paid membership includes discounts on training and other benefits. This is on top of benefits of free membership.
This new addition means it’s now possible to get a 365-day license for all the components of the vRealize Suite 2019, including vRealize Automation 8. The license is for personal use in a home lab. I had previously tried updating the license on my vRA 8 installation from an Advanced to an Enterprise one, using Lifecycle Manager. It didn’t like that.
After spending a lot of time looking at the web interface for vRealize Automation 8 (vRA 8), I decided to look under the hook a bit. One of the first things I looked at was the logs. It seems one of the primary logs that vRA 8 uses is /var/log/vmware-vmsvc.log Upon viewing this log, I was greeted with the following spam:
[2019-12-05T11:47:54.126Z] [ warning] [guestinfo] GetDiskInfo: ERROR: Partition name buffer too small
[2019-12-05T11:47:54.126Z] [ warning] [guestinfo] Failed to get disk info.
[2019-12-05T11:48:24.128Z] [ warning] [guestinfo] GetDiskInfo: ERROR: Partition name buffer too small
[2019-12-05T11:48:24.128Z] [ warning] [guestinfo] Failed to get disk info.
[2019-12-05T11:48:54.127Z] [ warning] [guestinfo] GetDiskInfo: ERROR: Partition name buffer too small
[2019-12-05T11:48:54.128Z] [ warning] [guestinfo] Failed to get disk info.
As shown by the timestamps, this error will repeat every 30 seconds, resulting in this log being totally flooded with this error. I also confirmed this error was happening in another instance than my own. Upon googling the message, I found a Github issue entry that referenced this and how it can be caused by the very long paths with Kubernetes. vRA 8 uses Kubernetes heavily. The code fix that resolved this issue appears to have been folded into the v11.0.1 release of the open-vm-tools. When checking the version on the vRA 8 appliance, we can see the following:
That explains that
When checking the package info via yum, the versions available range from 10.2.0 to 10.3.10 from the repositories that vRA is configured to use. So it appears updating isn’t an option at this time.
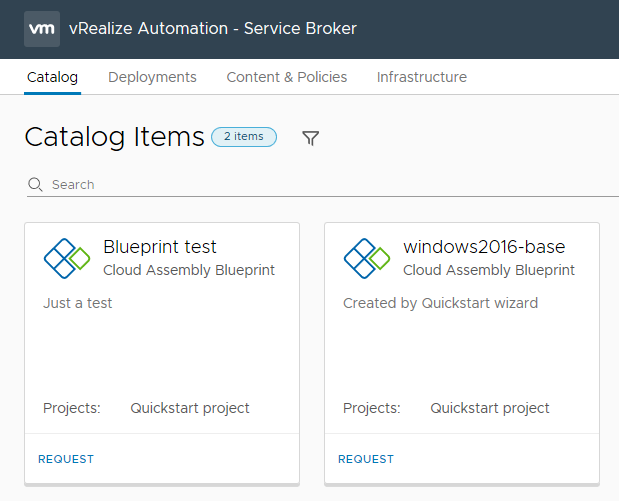
The Server Broker section of vRealize Automation 8 contains the items that your consumers will interact with the most – the Catalog, and the Deployments tab where they can review the status of their requests. It also has some administration areas, such as Content & Policies and Infrastructure
The Cloud Assembly section of vRealize Automation 8 is the one that vRA Administrators will most likely spend the most time. In vRA 7 terms, it constitutes aspects of the Infrastructure and Adminstration areas, plus the Blueprint Designer.
Infrastructure
The Infrastructure tab contains the bulk of items relating to the configuration of vRA 8. The first item that most vRA administrators will have to head to is Cloud Accounts, under the Connections heading. This is where the account details for various public cloud and VMware offerings are configured. A typical scenario in this area could be vCenter and a couple of public clouds configured here.
Cloud Accounts already configured
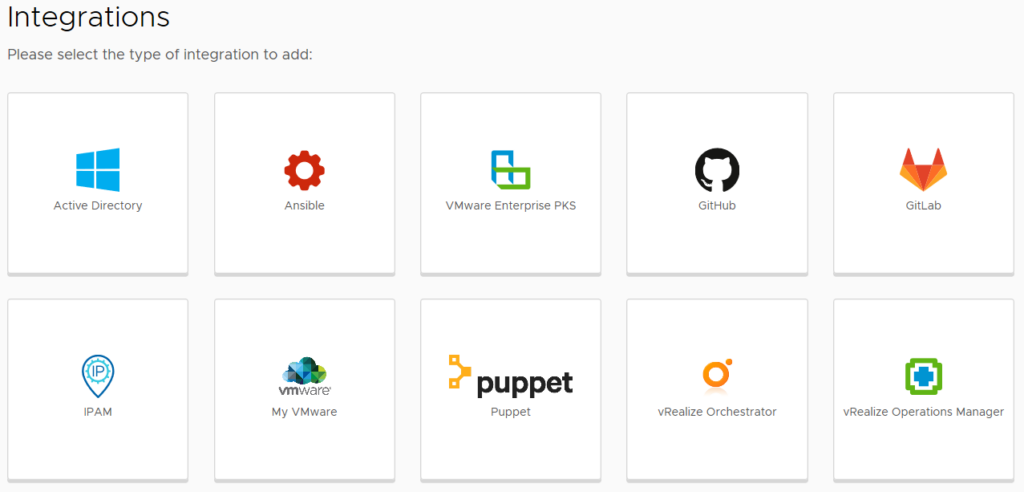
The other item under Connections is Integrations, where a range of VMware and third party integrations can be added. By default, there will already be an entry for the embedded vRealize Orchestrator (vRO) instance.
Integration Options
The next section of interest is Configure, which contains the items of Projects, Cloud Zones, Kubernetes Zones, Flavor Mappings, Image Mappings, Network Profiles, Storage Profiles and Tags. Some of these are mentioned during the Guided Setup (as shown in the Getting Started post).
Network Profiles allow the creation of objects that control network behaviour and settings. The options that become available when creating a Network Profile depend on the Cloud Account selected. For AWS, the settings include the ability to create on-demand networks or security groups, and the selection of existing networks. Tags can also be applied. For vCenter-based Network Profiles, there are options to add IP ranges. When selecting existing networks to use, discovered items are shown with extra information. For AWS, this can include the CIDR or whether public IPs are enabled.
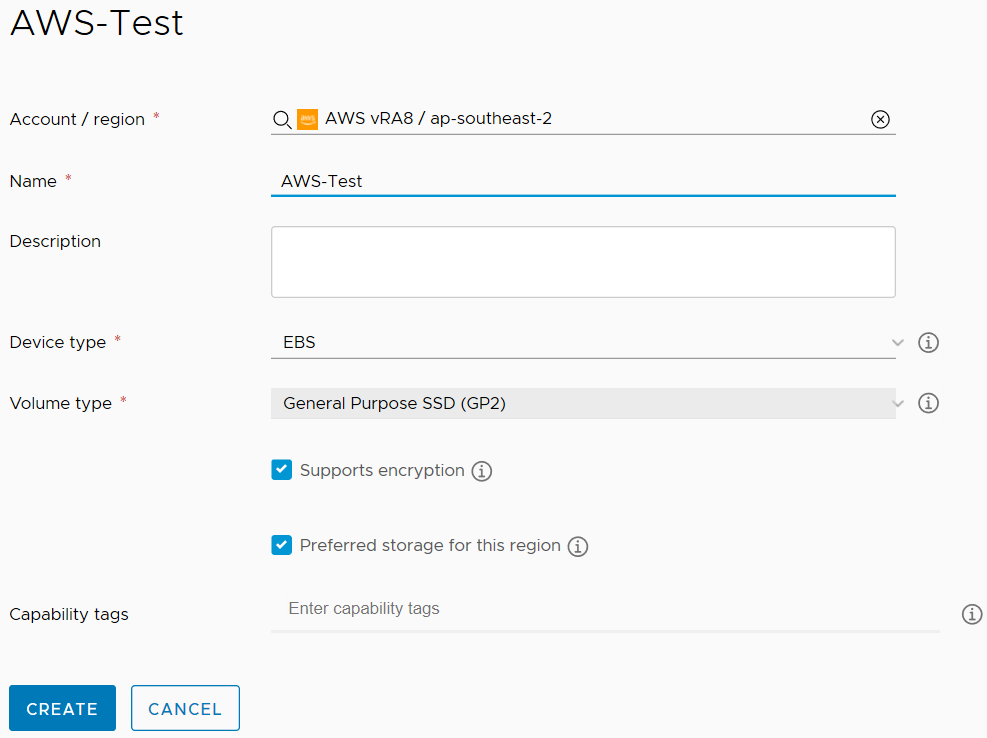
Storage Profiles control the way storage is provisioned for virtual machines. For vCenter Cloud Accounts, the standard set of settings are exposed, such as Storage policy, thin/thick provisioning, and datastore. For other Cloud Account types, the expected options are exposed.
Storage Profile options for AWS
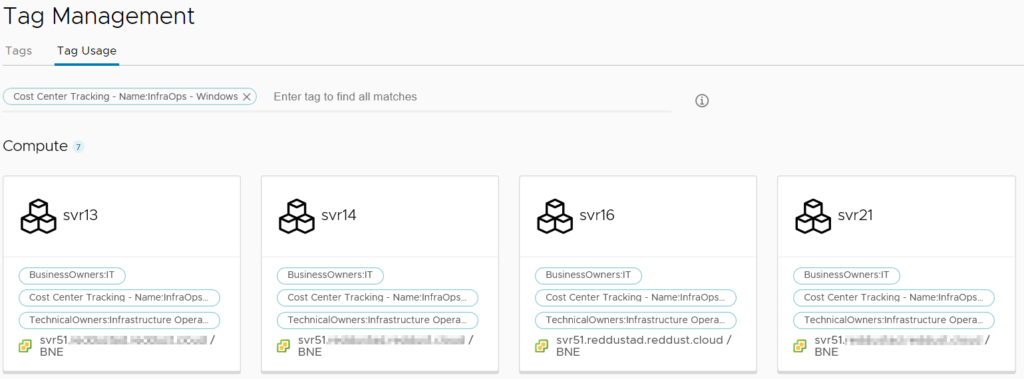
The Tags item lists all the tags discovered across all the Cloud Accounts. It’s then possible to select one or more tags and see what objects are currently assigned those tags. A good use case for this would be if a cost center tagging system was being used. It would be possible to see what resources a particular cost center is using across all platforms.
Tag Usage by the Windows Infrastructure Operations Team
The Resources section sits under Configure and has a by-type breakdown of all resource items that vRealize Automation can see. These items are Compute, Networks, Security, Storage, Machines, Volumes and Kubernetes. Compute lists high level abstractions of the compute capability in each Cloud Account and the administrator can’t do much in here except apply tags.
The Networks item has more content and actions available. It lists all networks discovered across Cloud Accounts. There’s also the ability to manage IP ranges, review individual IP addresses being managed, view load balancers and view “network domains”. These network domains are the top-level network object for each platform type (ie. for AWS, that would be VPCs).
The Security item lists only Security Groups that have been discovered. In the case of my configuration, this meant security groups from AWS. The only action that can be performed in this area is to add or remove tags.
Storage has three tabs – Storage Policies, Datastores/Clusters and Storage Accounts. The first two tabs are vCenter-focused, with Storage Policies listed the discovered policies. Tags can be managed on these policies. Datastores/clusters is has similar functionality, appearing to be mainly for informational and tagging purposes. Storage Accounts lists any defined Azure storage accounts and can be tagged.
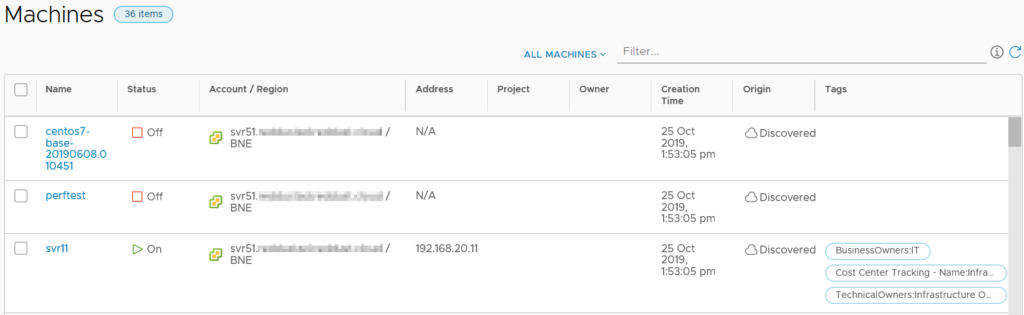
The Machines item lists all the machines across Cloud Accounts and includes information like status, IP address, Project, Owner and tags. There’s also the ability to filter the list by a variety of criteria.
The Machines list
Volumes lists all the “volumes” that have been discovered, which seems to include CD-ROM and floppy disk drives on vCenter VMs. Unfortunately the interface doesn’t list what machine the volume is attached to in the list view. It is possible to find this information by drilling down into the object.
The last area of any real interest under the Infrastructure tab is Onboarding. This area relates to creating “onboarding plans” for machines the vRA has discovered but isn’t managing. A benefit of this onboarding process is that vRA will create a blueprint based on the machines imported.
Extensibility
The Extensibility tab appears to share a lot of common elements with vRA 7, allowing the use of “Subscriptions” for triggering Orchestrator workflows. The menu items for this tab are shown below.
Extensibility menu items
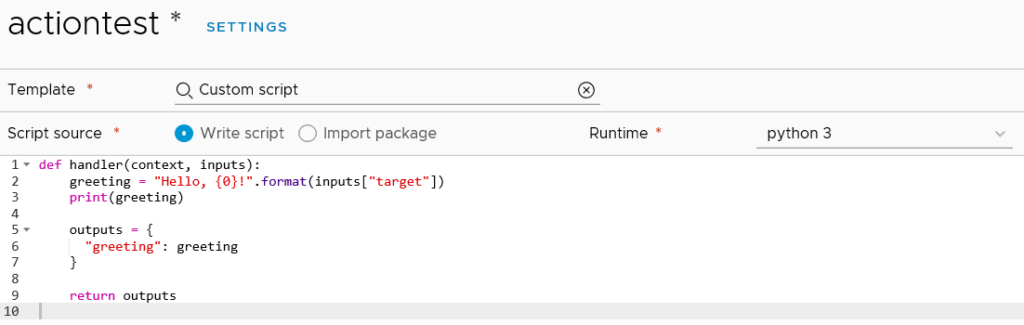
The Workflows item lists the 463 vRealize Orchestrator workflows that come with version 8, but it doesn’t seem to be anything to do in this area except look at them. The Actions item has no items listed, even though Orchestrator has over 400. Creating a new Action loads a code editor where the administrator can opt to write their code. By default, it seems to load the “Custom script” template which exposes the new ability to write python or nodejs code.
Action code editor
These Python-based scripts are part of the new “Action-based Extensibility” (ABX) that VMware have introduced in vRA 8. They are similar to how one might use vRealize Orchestrator workflows in vRA – to have automated tasks run at specific triggers. There is a reference in the documentation on ABX that suggests the code is actually run in the cloud, specifically using AWS Lambda. As such, an AWS subscription is required.
Marketplace
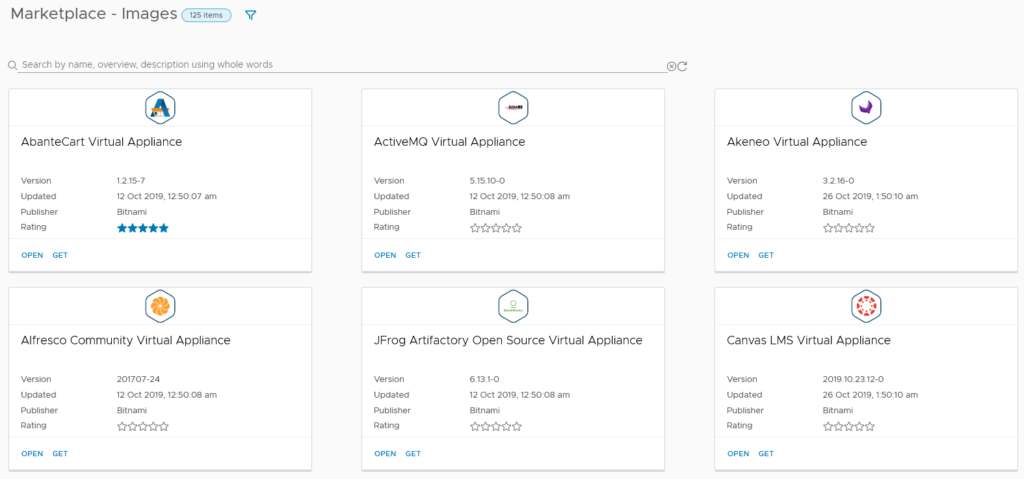
The Marketplace tab is an extended version of that which appears in Lifecycle Manager (LCM). It has three main areas – Blueprints, Images and Downloads. Images is a like-for-like match to LCM’s Marketplace content, containing virtual appliances from Bitnami and other vendors.
Marketplace Images
The Blueprints section is the more traditional blueprint items. Some are clearly designed for cloud-based deployments, such as one that uses AWS Redshift. Others are VMware-focused, relying on NSX. At the time of writing, only 18 blueprints are available.
Blueprints
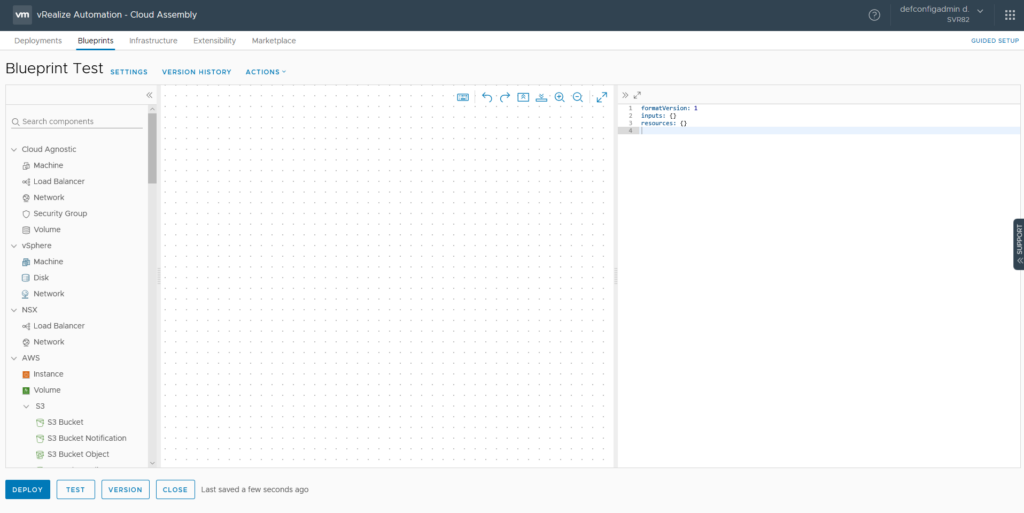
The Blueprints tab represents a major area of use for infrastructure engineers and developers. This is where blueprints can be created, tested and reviewed. At a high level, the Blueprint Designer in version 8 has a lot of common elements with version 7.
vRA 8 Blueprint Designer
Two major changes are visible in the screenshot above. Firstly, with the Infrastructure-as-Code (IAC) approach in vRA 8, the actual code of the blueprint is shown on the right side. A lot of the detail defining in a blueprint is now performed in this code area, as opposed to GUI elements in version 7. The other major shift is the expanded range of components from cloud services. It’s now possible to have cloud services like AWS’s RDS or Lamba or Azure’s Key Vault directly on the blueprint.
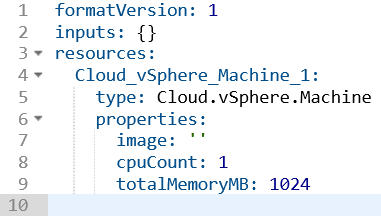
Verison 7 had a nested approach where certain objects could be nested inside of others. This seems to be gone now in version 8, with objects related to each other. A good example of this is the Configuration Management items like Puppet and Ansible. Adding items to the blueprint will generate a skeleton of code on the right side.
Generated code for a vSphere Machine component
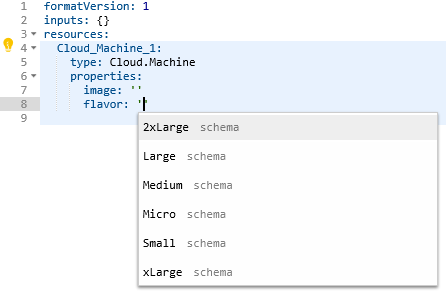
In some cases, a lightbulb will appear which assists in filling out the code. In the case of the vSphere machine, clicking this icon displayed a list of optional parameters that could be added. When using certain blueprint items, the fields that require values will show available options when clicking inside the quotes. For example, when clicking in the image or flavor properties for a Cloud Agnostic VM, Image and Flavor Mapping items will be listed.
Available values for Flavor
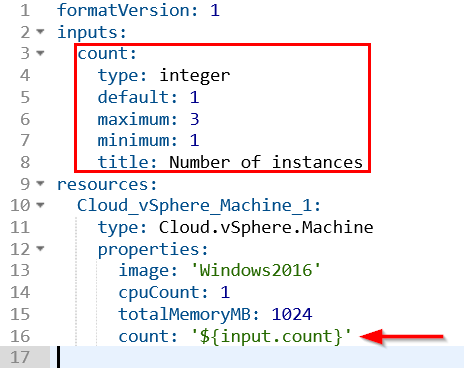
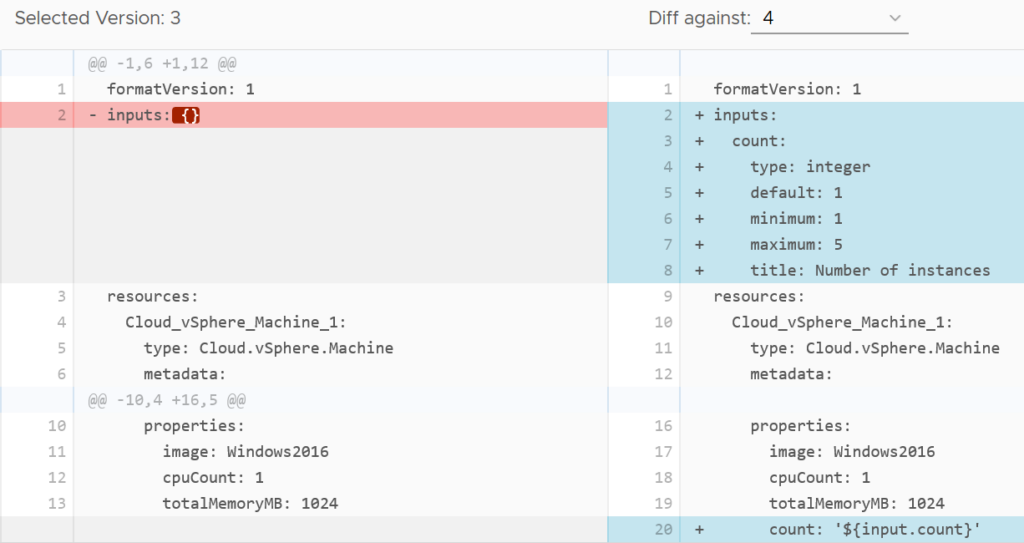
The code view also has real time syntax checking to point out errors. This helps ensure the code is valid and will work when deployed. It’s possible to define a number of inputs for a blueprint, removing the need to hardcode a lot of values. There’s a decent range of controls that can be applied to the inputs to prevent bad values being entered.
Defining a “count” input and binding the value
With the Infrastructure as Code focus, blueprints now have built in versioning support. This helps avoid the sort of thing I’ve seen in some organisations where version control is done by copying the blueprint repeatedly with an incrementing number in the name. With this proper versioning capability comes support tools like code diff.
Blueprint diff
Closing Thoughts
Now that I’m getting into the actual areas of day-to-day use of vRealize Automation 8, it’s clear that in some areas there’s a lot that’s changed under the hood and for the better. The versioning support is a good acknowledgement that there’s often more than just one vRA administrator in many organisations and it helps avoid that “stepping on each other’s toes” situation. The code-based approach for blueprints may be a change for some. Those who have already come from IAC backgrounds (especially AWS Cloudformation or Terraform) should feel very comfortable with the concepts in the code-based blueprints.
Towards the end of the Easy Install wizard for vRealize Automation 8 (vRA 8), a link is provided for the vRealize Automation 8 UI. Accessing this link will load a landing page that shows a short piece of text and a link to a login button.
vRealize Lifecycle Manager (LCM) is the first component installed by vRA 8’s unified “Easy Installer”. One of its primary functions is the deployment of VMware’s vRealize products. As mentioned in my Installation post, a link to the LCM UI appears towards the end of the installation process. The Dashboard of LCM has five items: Lifecycle Operations, Locker, User Management, Content Management and Marketplace
vRealize Automation 7 has been travelling along for a while now. While it’s now at a level of maturity, it’s always been a complicated application, even just in terms of infrastructure (with the need for Windows-based “IAAS” servers). vRealize Automation 8 would appear to represent a tipping point for a lot of things VMware has been working on in the background across multiple products and technologies.
The deployment architecture in vRA 8 represents a significant shift from prior versions. The installer deploys three virtual machines. These VMs will consume a total resource set of 12 vCPU, 44GB of RAM and about 246GB of disk space.
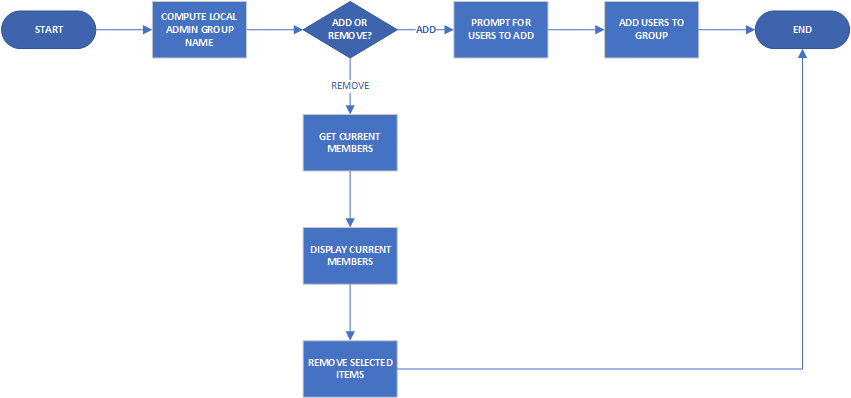
One of the major benefits of vRealize Automation (vRA) is the ability to add and extend the “Actions” available. These Actions enable self-service by the customer. One scenario I wanted to try was allowing someone to manage local administrators on a virtual machine they had provisioned.
Creating The Workflow
The starting point with this is creating a Workflow in vRealize Orchestrator (vRO). Managing local administrators would mean being able to add and remove members, so if I wanted it as a single workflow, there would be some sort of branching logic, such as the flowchart below: